Monday 25 February 2013

Cocktails and Cupcakes

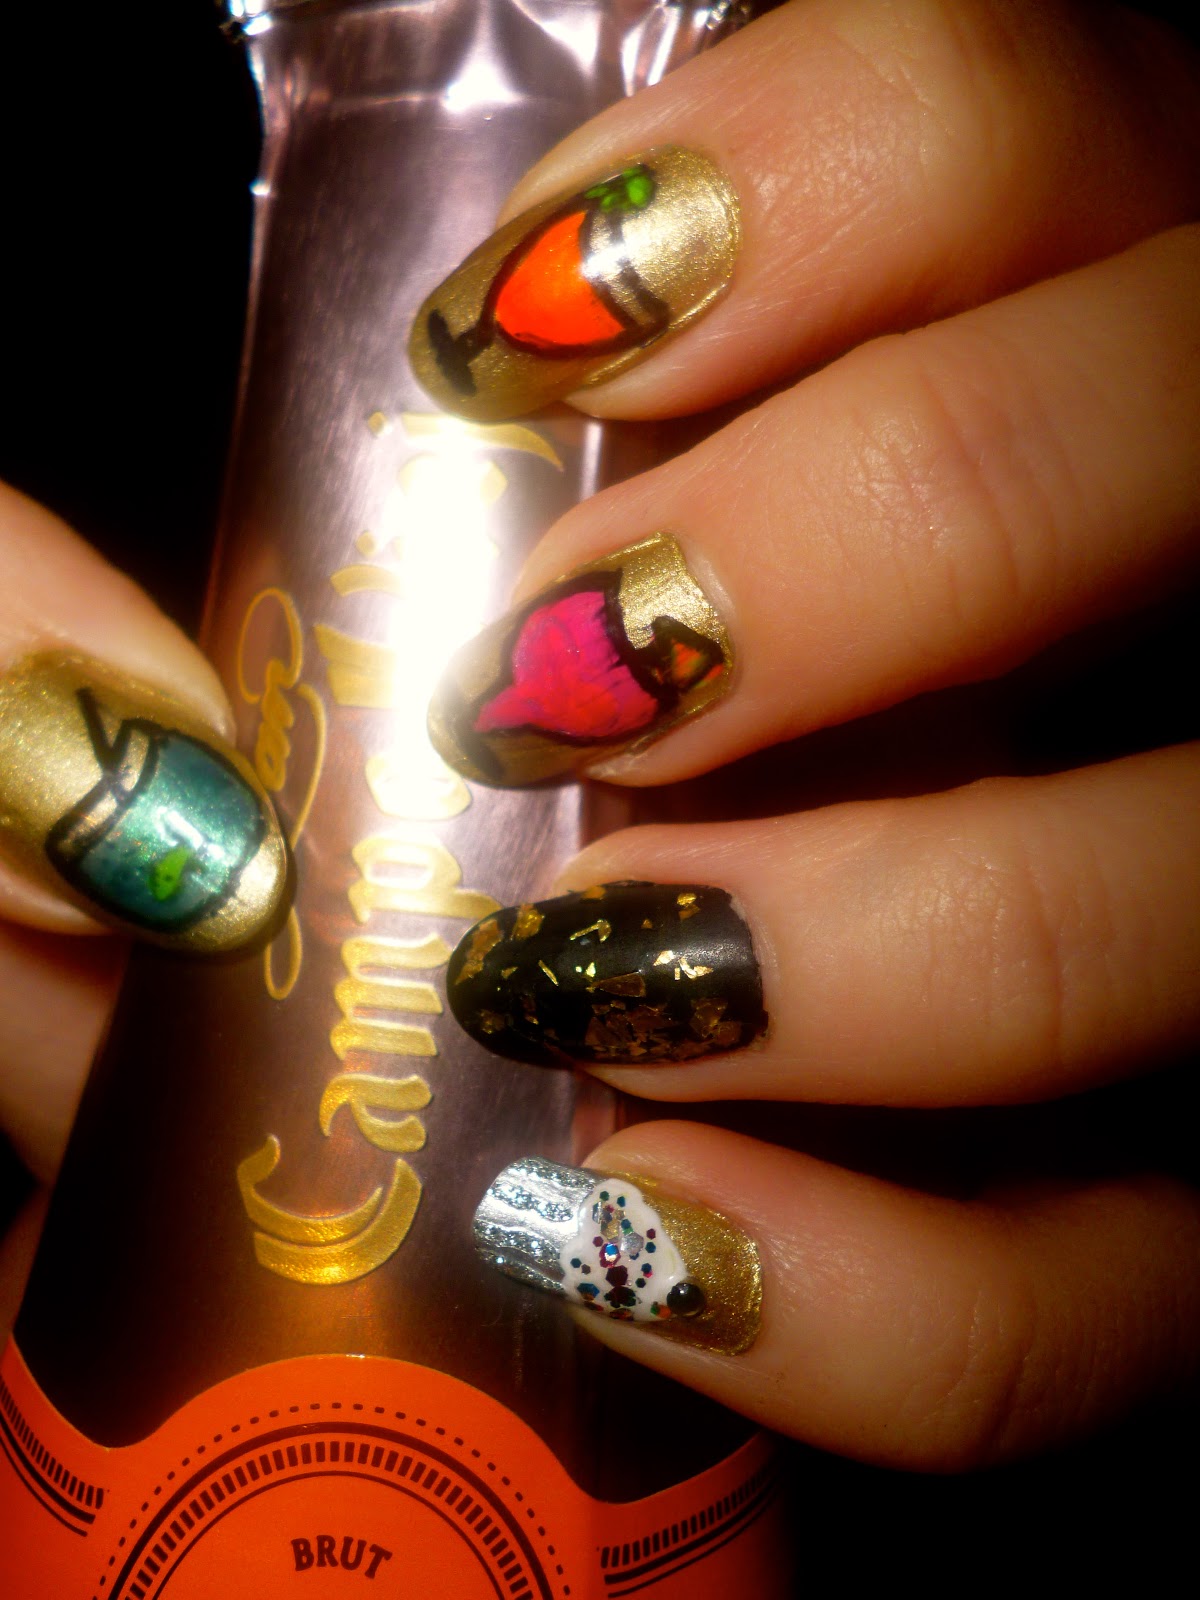
My birthday party was a Cocktails and Cupcakes theme gathering at a bar and I decided to reflect this in my nail art design. 

The base coat used is Barry M Gold foil. I used Sharpies to draw out the outlines of the cocktails.  A dotter was then used to fill out the details.

On the left hand I did a fish bowl cocktail, a bronx and a cosmopolitan cocktail.

Left hand

On the ring finger I used Black Velvet by LA colours with a Rimmel London Matte Finish top coat in order to add more contrast to the gold craft glitter which I stuck on top.

On the little finger I did a cupcake (used the same style and technique as my
'Cupcakes and sprinkles ^_^' post) .

On my left hand a bellini, blue lagoon and a raspberry tea party cocktail were done.

Right hand


Forgot to mention in a previous post that I had received an awesome birthday cake that was created into a shape of a nail polish bottle. Fortunately the flavour was not nail polish and actually red velvet 
(NOM NOM). 

Nail Polish Cake ^_^

- Nail Art Love -

Sunday 24 February 2013

BUCS Championships

A great deal of my time is spent on fencing related activities: trainings, competitions, fencing friends, running the fencing club etc. This weekend it was time for the BUCS Individual Championships, which is the only individual event that BUCS hosts over the year (otherwise it's all teams), and I decided to match my nails to the event.

As inspiration for the digits, I used Sport Imperial's logo (the body which the fencing club is a member of), and wrote "BUCS" on one hand and "ICFC" (Imperial College Fencing Club) on the other one. It was a bit messy, especially any letter that is round(-ish) was hard to write nicely. It didn't help that my white polish was running out. 


For the thumbs, I painted the outline of a small fencer. For someone who doesn't do the sport, it turned out to be a bit unclear what it was, but fencers really appreciated it. At the hotel the night before the competition, I attempted to do the same design on one of the other girls, but we could only find a plastic spoon to use as a tool, so it got a little messy. One of hers definitely has fencing thighs though!


Tuesday 19 February 2013

Paris/Valentine & London Fashion Week

Valentine's day has passed, and for me it was followed by a weekend in Paris for a fencing competition. I figured that the two events worked quite well together and decided to go for a combined design.


As inspiration, I had the classic print often found on souvenirs, in particular bags, with the city name repeated over and over again, occasionally in a different colour and to give it even more of a Valentine's touch, I used a toothpick to paint hearts on index and ring finger on left and right respectively.

LOVE PARIS LOVE LONDON

For the base, I used Barry M's silver foil, and on top of that I wrote "LOVE PARIS LOVE LONDON" in alternating black and red using Sharpies. If this is something you want to try, then beware that writing with your non-dominant hand (I ended up doing it backwards and upside down as well, as it otherwise required me to twist the hand too much) is a bit tricky. Make sure to get the letters the right way around!

One of the girls has walked for the London Fashion Week on the Friday, and you can see the s design she got on the picture below. The design is probably meant to be quick: a simple dark base to match the earthy team, a quick L-shape first in white then in neon orange (which glowed in certain disco lights we discovered later).


Valentine/Paris & London Fashion week respectively

Monday 18 February 2013

Amor con Besos y Abrazos

On myself, not ready to part with the jewelled nails yet I added some Valentine details ontop. Please see the 'Jewelled Nails - Lapis Lazuli and Amethyst' post for more information about the nails base.


I used a neon pink Sharpie to write Love and a red Sharpie to add hearts on the left hand. On the thumb I drew hugs (orange Sharpie) and kisses (pink sharpie) and a heart (red Sharpie) in the bottom corner.


On the left hand I used a neon pink Sharpie to write Amor (love in Spanish and a small nod to my rather confused nationality) and a red Sharpie to add hearts on the left hand. I did the same on the right hand thumb as the left hand thumb. (Sadly the m in amor did not come out very clearly in this image).

Hope you all had a good Valentines day!

- Nail Art Love -

Owl will be your Valentine


With it being Valentines season, Valentine nail art designs were done.

On my nail model Athena, she requested owls with a Valentine twist. 


The base coat was the Kiko Holographic nail polish in Peacock green. I used a pin and toothpick to do all the art work and detail for these nails.

The tree branch was done using Purple Ash by Models Own.


Antique burgendy (dark red) by LA Colours was used for the body of the darker owl and hearts.

Absolute (neon pink) by LA Colours was used for the body of the lighter owl and hearts.


Flicker and Black velvet by LA Colours were used for the owls eyes and beaks.


^_^

- Nail Art Love -

Jewelled Nails - Lapis Lazuli and Amethyst


With the 18K Gold Top Coat I tried to create a Lapis Lazuli effect on the nails.

Lapis Lazuli Inspiration
I used Motcomb Street by Nails inc. London as my base navy colour and put a coat of Pearly Malachite Green (shade 300) by Kiko to add more sheen and lighten the blue. On my ring finger I used Cabaret by Gina Tricot in order to get a purple Amethyst colour (subtle birth stone idea with the birthday around the corner). 


Then the 18 K Gold top coat by OPI Sephora on top of all of the nails.


A very pretty jewelled effect was obtained ^_^

-Nail Art Love-

Friday 15 February 2013

Cupcakes and sprinkles ^_^

Charlotte arranged a kick ass tea party which I thought required some cute cupcake nails. I used a nude pink colour as the base and painted on little cupcakes on all the digits except the ring finger. 


For the ring finger I used a gold base coat and then covered it in nail caviar beads which really reminded me of cupcake sprinkles. Each cupcake was topped with a sequin and then the middle thumb and thumb were further decorated with a sprinkle of nail caviar beads.


Only downer of this design is that they made me the munchies...

Nail art designs at the tea party

Check out the ' "Bow ties are cool" - Dr Who ' post to see Charlottes nails (far right hand in image above) which she did for the tea party. Also see the ' Hyde Park Relays & Daleks ' post to see the Dalek nails we did on Helen (middle hand in image above).

- Nail Art Love -


Zombie season

In the end of January I decided to do a zombie theme design. This was influenced by the fact the Science Museum lates I attended (30th Jan) was about zombies and also I had bagged a free preview ticket to see warm bodies (thank you slackers club!).

Went with a rather bright happy green for the zombie skin colour and used both nail art pens and sharpies to do the detail. I sponged some red nail polish ontop to give a bit more of a gorey feel towards it and drew in some fleshy/brain looking parts in the corners of some of the nails.


The Sharpies (or any permanent marker pen) worked well for the detail and I will probably use this trick for future designs as it was easier to control than the brush and you avoid dripping and consistency issues.


Overall am pretty damn happy with how these turned out and they were appreciated at both events.

- Nail Art Love -

Monday 11 February 2013

Hyde Park Relays & Daleks

What to do if you have designs that you feel you haven't got time for, but simply can't wait to experiment with? There's a great solution to this: painting other people's nails! Gema's sister has been her 'model' several times by now, and over the past week I've introduced nail art to two friends. The first time it was a spontaneous idea; we were having brunch and I suddenly remembered that my friend was a big Dr Who fan, and rarely got around to doing things such as painting her nails. I had previously been looking at a Dalek design and being to impatient to wait until the new series started, I took the chance. 

To make the dots we took a pin and put it on a rubber. If you look closely you can also see the eye in the middle of each top dot - these were made with toothpicks which was also the case for the lines at the top. Colours are red/gold, black/gold, silver lake/black, marine blue/silver


Daleks, from the TV series Dr Who.
Second nail model was a planned thing. A running race, The Hyde Park Relays, was being organised by Imperial's Cross Country Club and I had played with the idea of making a design but couldn't fit a time for it to between other plans. The club's president volunteered to model for it, and result can be seen below.

The idea was to use Sport Imperial's colours, which also arethe club's colours, and then simply letters to name the club and the race. The extra detail was to the index fingers on which I tried to paint running legs (using a Sharpie) with a nice blue sky and just a single cloud on each. Funnily enough, one of the clouds ended up a bit close to the ground, so it looks more like a sheep, but overall I think it turned out rather well!

As mentioned, the details on the index fingers were done with Sharpies. The white letters were written using a striper from Primark, which was a bit tricky for the rounder shapes but worked fine, and the rest is normal brushes.
Photo by Ed Hallett

IC XC - Imperial College Cross Country

Hyde Park Relays design

Photo by Ed Hallett


Sunday 3 February 2013

"Bow ties are cool" - Dr Who

I've gone through a period of spring colours. I was lacking inspiration for earlier, and decided to go for something fairly straight forward, which happened to be stripes. Unfortunately the only picture I have of this is the one to the left, where I still haven't got around to cleaning up around the edges. The idea was great, even if the stripes ended up a bit wobbly, and I probably would go for a white contrast rather than nude, as I had now. In order to make it look like a little more was happening, the stripes rotate ~45 degrees between each nail.

Later on, I decided to return to my faithful book from Wah! Nails for ideas. I was hosting a brunch and wanted something that could be labelled "pretty", and found this bow tie design. I had looked at it earlier but not dared it, mainly because of the contours. However, Gema had recommended that I should buy some thin, permanent markers and use that, so it became the mission of the weekend. For the base I used Kiko's Neon Pink and a colour called Blue Ice from the Swedish store Gina Tricot. In the inspiration picture they used pastel colours, but this gave the design a bit more "ompf" to it.


I have also got around to make a reference card with my current polishes, thin brushes and permanent marker colours. Turns out to be a fairly substantial, and growing, collection! 


Finally: some friends are hosting a competition coming weekend, Hyde Park Relays, so are using one of them as a model to make an event design, which I'll try to post about over the weekend. I also know Gema has got some great designs to show off, so return soon!